Abstract
The two-dimensional flow about a teardrop-shaped wingmast and sail combination is explored using Drela’s XFOIL airfoil design and analysis tool. The key flow features, consisting of laminar separation bubbles, separation bubbles at the mast/sail junction, and trailing edge separation are described. A method of designing a wingmast shape based on a reference airfoil is presented, and a family of wingmast designs based on the Clark Y airfoil is analyzed. Systematic variations in mast size, mast rotation, angle of attack and Reynolds number are presented to show the effects of the principal design and operational considerations.
Notation
c chord, ft
Cd drag coefficient, d/(q c)
Cl lift coefficient, l/(q c)
Cp pressure coefficient, Dp/q
d drag per unit span, lb/ft
l lift per unit span, lb/ft
p pressure, lb/ft2
pa ambient pressure, lb/ft2
pt total pressure, p + q, lb/ft2
q dynamic pressure, 1/2rV2, lb/ft2
V air velocity, ft/sec
Vo freestream velocity, ft/sec
r air density, slug/ft3
Introduction
The aerodynamics of sails alone, and the aerodynamics of round masts plus sails have been studied for some time, both in theory and in the lab. Likewise, rigid wing rigs can benefit from the body of knowledge aimed at aircraft high lift configurations. But there’s very little information on wingmast-sail combinations. I’ve used XFOIL (Ref. 1) to calculate the characteristics of wingmast-sail airfoils, and I’m beginning to appreciate just how remarkable this combination is.
This paper concerns itself with teardrop-shaped wingmasts. These masts can be rotated independent of the sail so that the lee side can be made a smooth contour on each tack. There are other types of wingmasts, using parabolic (Ref. 2) and elliptical (Ref. 4) sections. The flow around the blunt trailing edges of these sections cannot be calculated by XFOIL because the surface contours are too severe. Since these alternate wingmast shapes could not be compared on an equal basis, this paper only includes results for the teardrop masts. However, most of the flow features of these other masts are also exhibited by the teardrop masts, such as separation bubbles spanning the mast/sail junction.
Before I get into the aerodynamics, a cautionary note about the limitations of the methods I’ve used. The theoretical methods in XFOIL are strictly two-dimensional. That is, they apply to the cross section of a shape that is infinite in length and rigid. A real soft sail is inherently a three dimensional, flexible problem, since we all know that the shape of the sail is affected by the tensions up and down the sail, as well as the tension in the streamwise direction. So you really have to combine the material strains and the aerodynamics of the whole rig to get the true picture. But two-dimensional flow isn’t a bad approximation and it has a lot to say about the cross section shape. The other limitation is that XFOIL can only handle a limited amount of separated flow. The wingmast calculations in this paper stress XFOIL to its limit. XFOIL has been shown to be reasonably accurate at calculating the effects of laminar separation bubbles on conventional airfoils, and less accurate with regard to estimating maximum lift. To estimate these characteristics properly would require a Navier Stokes code. However, one can see the key flow characteristics in the XFOIL results, making them qualitatively correct, and the trends are probably well represented even if the absolute results are somewhat in error. Large oscillations in the drag polars indicate poor convergence in XFOIL, and while the data are highly suspect they are presented to show XFOIL’s limitations.
Flow Features
A computed velocity distribution for a typical wingmast-sail combination is shown in Figure 1. The basic features of the flow around a wingmast-sail combination in a light wind are shown to scale at the bottom Figure 1.
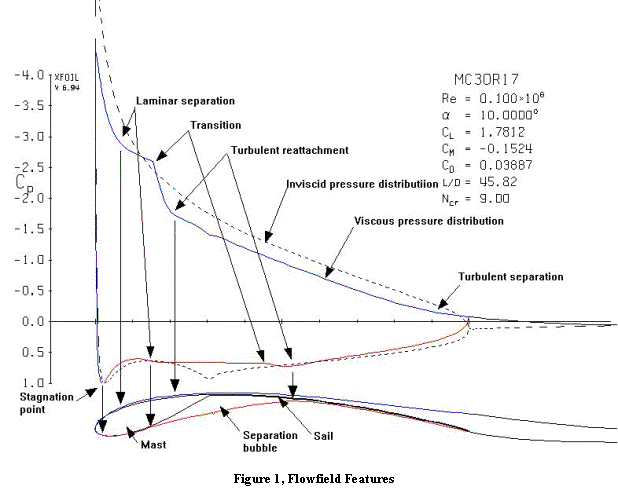
Outer Flow
For most of the flowfield, the flow is irrotational and all the kinetic energy is comprised of the linear velocity. Small volumes of fluid in this region move like the cars in a Ferris wheel – moving along curved paths but preserving their orientation. Conservation of energy; with kinetic energy represented by the dynamic pressure, q, and the potential energy provided by the pressure, requires the total pressure to be constant in this region, so there’s an inverse relationship between the velocity and the local pressure (Bernoulli’s law). Negative pressure coefficients, where the local pressure is less than atmospheric pressure, indicate the velocity is higher than the freestream velocity. Positive pressure coefficients indicate the velocity is lower than freestream, and when Cp=1 the velocity is zero and the flow is stopped relative to the surface.
Conservation of mass requires that for any arbitrary volume the amount of flow exiting the volume must equal the amount of flow entering. This plus the irrotational nature of the outer flow means the conditions throughout the flowfield are dictated by the conditions at the boundaries of the flow. Far away from the sail, the flow conditions are assumed to be uniform. But the conditions change smoothly and increasingly rapidly as the surface is approached.
When the pressure changes over some distance, any small volume of fluid will have an unbalanced pressure on each side, and this net force accelerates the fluid, either changing its speed or its direction of motion in accordance with the conservation of momentum. This links the pressure gradients, the bending of the flow direction, and the local flow velocities so as to satisfy the three conservation laws: mass, momentum and energy.
As the wind approaches the leading edge, part of it will pass to leeward, part to windward, and the dividing line between the two will come to a complete stop near the front of the mast. This is known as the stagnation point, and it’s where you’ll find the highest pressure on the whole airfoil. Everything else is downhill from here. The stagnation point can be located on the pressure distribution at the point where Cp=1, because the pressure there is equal to the total pressure.
As the air whips around the leading edge, it speeds up tremendously because of the low pressures needed to make it bend around the sharp curve. Conservation of momentum requires there be a net force acting on the air to make it change direction, with higher pressure on the outside of the curve and lower pressure on the inside. This results in low pressure where the flow along the surface is convex and high pressure where the flow is concave, because the pressure fades to ambient pressure away from the surface. But the low pressure region also accelerates the flow as it comes away from the stagnation point. So in a short distance, it goes from dead stop to the highest velocities it’ll see on the whole airfoil, as indicated by the large negative pressure peak in Figure 1. But it has to slow down to get back to something near ambient pressure (Cp=0) by the time it gets back to the trailing edge.
On the windward side, the bending of the flow puts the surface on the outside of the curve, so the pressures there are generally higher than ambient or the pressure on the lee side. The sharp crease at the mast/sail junction leads to a second stagnation point in the inviscid pressure distribution. This location of this second stagnation point plays a key role in the aerodynamics of the wingmast because it causes a steep adverse pressure gradient on the windward side of the mast, but a favorable pressure gradient to the windward side of the sail.
The difference between the high pressure on the windward side and the low pressure on the leeward side, shown by the difference between the red and blue lines on the graph in Figure 1, constitutes the normal force generated on the section. We want the curves to be as far apart as possible, but they have to come together at the end.
Boundary Layer
Now it’s a strange but true fact that the air that is immediately in contact with the surface sticks to it and does not move! This air drags on the volume of air going by just outside of it, which drags a little less on the volume outside of that, and so forth. The result is a thin boundary layer, in which the airflow relative to the surface goes from zero velocity to whatever the local velocity is just outside the boundary layer.
The slower speed flow in the boundary layer displaces the outer flow as though the surface had a different shape, and the red and blue lines at the bottom of Figure 1 show this effective shape. The colored lines at the bottom of the figure are the result of integrating the effects of the boundary layer from the surface into the outer flow field because there is no definite edge to the boundary layer. They are not truly the streamlines in the viscous flow, but would be the surface streamlines in potential flow for a body that has the same pressure distribution. But this is qualitatively a good approximation of what the near-body streamlines are like.
The black dashed line in the upper graph shows the (inviscid) pressure distribution that would have resulted had there been no boundary layer. The colored lines show the computed pressure distribution taking into account the boundary layer displacement shown at the bottom.
So there’s this intimate dance between the boundary layer and the outer flow field. The pressure gradient has a strong effect on the boundary layer development as it is swept downstream and the shear stress diffuses outward from the surface. But the boundary layer also changes the effective shape, bending the flow and affecting the pressure gradients. This creates a feedback loop, with the conditions at the trailing edge affecting the flow over the rest of the section.
Within the boundary layer, the conservation of energy has to consider the rotation of the flow as well as temperature changes and the total pressure is no longer constant, so the Bernoulli relationship between pressure and velocity no longer holds. But experiments have shown that the static pressure is approximately constant across the boundary layer, so the pressure acting on the surface is the same as the pressure at the outer edge of the boundary layer.
The care and feeding of this boundary layer is what two-dimensional section aerodynamics is all about. If it weren’t for the boundary layer, any shape would produce about the same lift, there would be no drag, and no stall to limit the maximum lift. The pressure distribution generated by the outer flow field only matters because of the way it affects the conditions within the boundary layer. To get good performance, you have to stress the boundary layer hard. But push it too far, and it’ll let go and your rig stalls. So the art of airfoil design turns out to consist of manipulating the pressure distribution in order to manage what’s going on in the boundary layer
At first, near the stagnation point, the boundary layer is very thin. But as you trace the flow downstream, the boundary layer gets thicker because the air slowed by the upstream surface continues to drag on the air farther out, and the air next to the surface is slowed down some more. So the effect of the surface diffuses outward into the flow.
At some point, the boundary layer can’t maintain this smooth state of affairs, and eddies start to appear. This is known as the transition from laminar (the smooth flow) to turbulent flow. A turbulent boundary layer is much thicker than a laminar flow, because the eddies are taking big chunks of low velocity air from near the surface, and throwing them some distance away from the surface. They are also bringing some of the higher velocity air from outside down closer to the surface. This higher velocity air gets slowed down, naturally, so this causes the “skin friction” of the turbulent boundary layer to be higher than the laminar boundary layer. But the turbulent boundary layer is not all bad, as you’ll see later.
There are something like four ways the flow can transition naturally to turbulent flow. Two (cross flow and attachment line instabilities) only apply to swept wings at high speeds. Another, in which small disturbances moving downstream in the flow get amplified until they turn unstable and kink up into eddies, can occur in on large wingmasts in high winds. Delaying this kind of transition (Tollmein-Schlichting instabilities) is what the famous NACA laminar flow airfoils (the 6-series designations) were designed to do. But, given the size of our rigs and the speeds at which we operate (especially in light winds), the laminar boundary layer is stable enough that we will almost certainly see the transition occurring after laminar separation.
But a laminar boundary layer is much more fragile with respect to flow separation and stall than a turbulent boundary layer. So we want to maintain a fair amount of laminar flow so as to keep skin friction low, but we want the flow to be turbulent as the air slows down heading back to the trailing edge. By using the turbulent boundary layer’s ability to slow down more, we can use higher velocities up front and get more lift. A laminar boundary layer is a little like driving on ice. You don’t dare go too fast because you can’t slow down quickly. A turbulent boundary layer is like driving on wet pavement - you’ve got better braking, so you can go faster without breaking loose. We want to get off the ice and onto the wet pavement before we have to start braking hard or we’ll lose it!
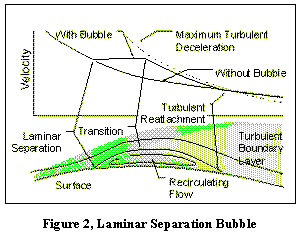
Laminar Separation Bubble
Laminar separation can occur when the pressure is increasing in the downstream direction. The pressure pushes back on all parts of the boundary layer, and the slow moving region next to the surface is proportionately more affected than the faster moving outer layers. At some point, the inner layers are brought to a stop. This is the point of separation. Further downstream, the adverse pressure is driving the inner layers backward, although the outer layers are still moving forward. At the point of separation the oncoming and backward-driven flows meet and since they can’t go through the surface, to satisfy conservation of mass the only alternative is to turn away from the surface.
Figure 2 (Ref. 5) shows what we want to happen when the laminar boundary layer separates. Right after it separates, the pressure becomes nearly constant, which is characteristic of all separated flow, and the flow becomes unstable. Soon eddies form and the flow becomes turbulent. When this happens, the pressure increases at pretty much the maximum rate that a turbulent boundary layer can sustain. If this pressure increase intercepts the pressure dictated by the shape of the surface itself, then the flow reattaches and forms a laminar separation bubble. If the two pressure curves don’t intersect, the flow stays separated and the airfoil may be stalled.
At reattachment, the same scenario plays out as at the separation point, but in reverse. Downstream of reattachment, the pressure gradient is no longer so adverse as to bring the inner layers to a stop – it may actually be a favorable gradient accelerating the boundary layer. So the backward recirculating flow is brought to a halt and conservation of mass requires the outer layers to flow toward the surface to make up for it. In two-dimensional flow, the result is a streamline connecting the separation and reattachment points, with the fluid between the dividing streamline and the wall recirculating endlessly.
However, in real life the flow is three dimensional, and fluid can escape out the ends of the bubble, particularly if the separation or reattachment lines are swept. So streamlines from the separation points can spiral up the bubble inside the streamlines to the reattachment points, forming a vortex sheet. This can often be seen by telltales that point straight up instead of pointing back (outside the bubble) or forward (inside the bubble).
These features can be seen in the XFOIL computed results of Figure 1, especially on the lee surface. The thin laminar separation bubble is barely visible on the boundary layer displacement plot at the bottom, but can clearly be identified by the shelf-like bump in the pressure distribution. The bubble extends between the laminar separation point at 6% chord to the turbulent reattachment at 11% chord.
Within the bubble, the air is recirculating, flowing backward next to the surface from the attachment point to the separation point. In marginal conditions, the bubble might cover a large portion of an airfoil. But this causes a lot of drag and is very fragile. A small increase in lift, the velocity gradient steepens, and poof! Stall. This is known as bursting of the laminar separation bubble. We want a short, robust separation bubble that is positioned where we want it.
So, for a wingmast airfoil, you want to have high velocities on the lee side for high lift, but you don’t want a really sharp pressure spike at the leading edge. This would mean a steep adverse pressure gradient there, and stall due to laminar separation without reattachment (the curves won’t intersect). Instead, when stall occurs, you want it to start because you’ve stressed the turbulent boundary layer too much at the trailing edge, and you want the turbulent separation point to move forward gradually as you increase the angle of attack. This makes for a gentle stall and a forgiving sail rig.
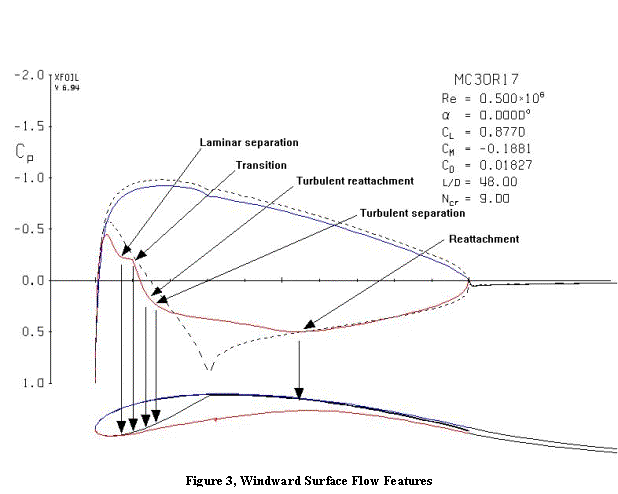
Figure 3 shows the same section at a higher speed and zero angle of attack such
that it is producing essentially the same lift as Figure 1. This might be the case if the sail were
sheeted out to maintain the same heeling moment in much higher winds. The stagnation point has moved from the windward
side of the leading to the center of the leading edge. On the windward side, there’s a peak
velocity near the leading edge and a steep drop to the joint between the mast
and sail. This adverse pressure
gradient will lead to laminar separation, possibly followed by turbulent
reattachment, and finally turbulent separation before the flow gets to the
joint. But look what happens after the
joint. The inviscid velocity is increasing
all the way to the trailing edge, which means the air is being sucked
along. It isn’t fighting an uphill
battle the way it is on the lee side.
So once across the joint, the flow reattaches again because the backward
recirculating flow loses its battle against the favorable pressure
gradient. This forms a turbulent separation
bubble near the mast-sail intersection.
This isn’t good, but it isn’t disastrous, either. It’s a price we have to pay for the symmetry
of the wingmast.
If the pressure increase on the mast’s windward surface is too great, which happens at low angles of attack, the flow separates and doesn’t reattach. This sets the minimum angle of attack for that shape. Small wingmasts have a much shorter distance between the peak near the leading edge and the joint at the sail. So the pressure increase is much steeper for small wingmasts. This means that a small wingmast has a narrower range of useable angle of attack between separation on the windward surface a low angles, and stall at high angles. Of course, the mast can be rotated to help alleviate this. However, the fact remains that a small wingmast will have a narrower “groove” than a large wingmast. This will make it more difficult to trim well, and it will be more affected by changes in the local flow angles along the mast, such as from gusts or wind shear. But it may also be lighter in weight and have less drag when it’s in the groove. And large wingmasts are dangerous for offshore craft because they can’t be reefed.
The skin friction within the separation bubble is either zero or negative, due
the backward moving flow at the surface.
But there is still a substantial drag penalty due to the change in
pressure on the mast. From Figure 3,
it’s apparent that the reduced pressure in the windward separation bubble is
acting on the backward facing surface of the mast. The projected area of this surface is the depth of the mast/sail junction relative to the
separation point, or approximately the maximum thickness of the separation
bubble. This is a significant contributor
to the profile drag.
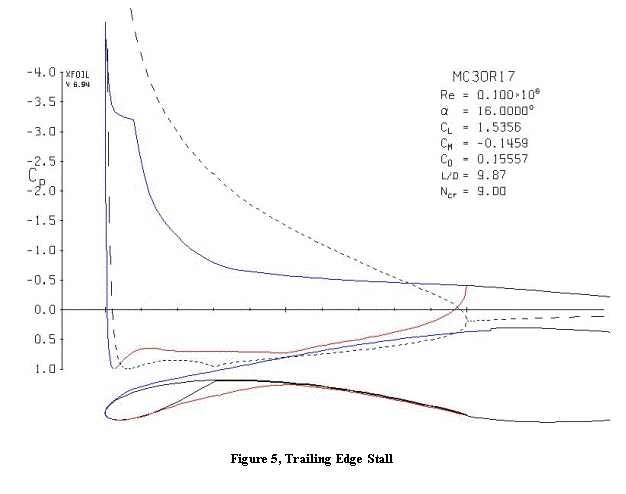
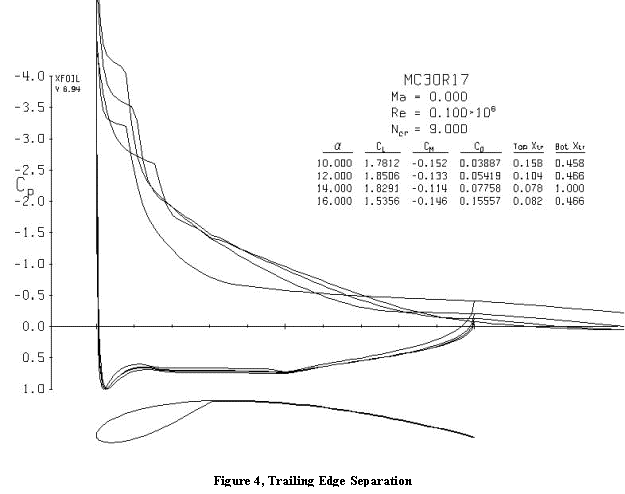
Trailing Edge Separation
The final flow phenomenon is trailing edge separation and stall. Figure 4 shows the progression of turbulent trailing edge separation, starting at the condition shown in Figure 1 and progressing past the angle of attack for maximum lift. As with the laminar separation bubble, the pressure is essentially constant in the region of separated flow. The leading edge suction peak becomes more pronounced as the lift increases. The point of laminar separation moves forward because the slope of the adverse pressure (decelerating flow) behind the peak is steeper.
However, the trailing edge separation point is also moving upstream and the deviation of the displaced outer flow from the sail shape at the trailing edge reduces the lift from its potential value. Above 14 degrees angle of attack the lift has peaked and is dropping. More than half the lee side surface is separated. The reduction in circulation actually reduces the leading edge suction peak at 16 degrees compared to lower angles of attack.
As can be seen in Figure 5, at 16 degrees angle of attack the leeside flow is not following the sail contour at all. This amount of separation is undoubtedly too great for the methods in XFOIL to calculate accurately, but the behavior is qualitatively correct.
Design

So how to come up with a shape for a wingmast? The best way is to design a mast and sail shape together, starting with the kind of pressure distribution you need. You want it to have characteristics that cause the laminar separation point to move smoothly from well aft on the airfoil at low angles of attack, to near the leading edge at high angles of attack. This will help to avoid leading edge stall due to laminar separation, and make for a progressive stall due to turbulent separation. Unfortunately, this requires a computer program, like XFOIL, to calculate the resulting shape.
Another approach I’ve come up with is based on modifying an existing airfoil. The conventional way of looking at airfoil aerodynamics is to represent the airfoil as a mean camber line plus a symmetrical pressure distribution. This was a good way of calculating the velocities in the days before computers, because you could calculate each one separately and superimpose the results. But another way of looking at it is to consider each surface separately. The velocity at a given point is heavily influenced by the airfoil’s curvature at that point. The more convex the surface, the more negative the pressures will be in order to bend the flow. Likewise, a concave surface will tend to have high pressures or an adverse pressure gradient in order to bend the flow the other way. So if we base the wingmast-sail shape on the lee side contours of an existing airfoil, the characteristics should mimic that airfoil’s characteristics to some extent. This approach works surprisingly well.
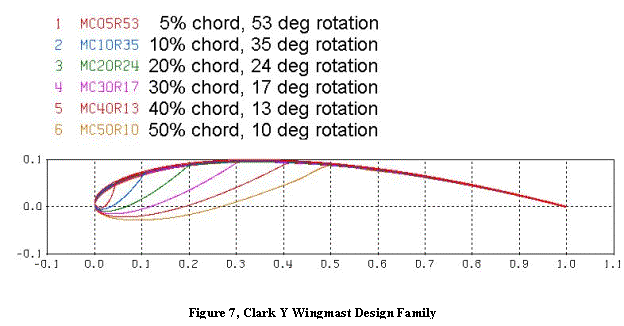
Figure 6 shows the steps in the process. First, select an airfoil that has the characteristics you want, especially near the leading edge. It should be fairly thick, because this will determine the draft in the sail shape and the mast rotation. It should also have the characteristic that the lee side laminar separation point (transition) moves smoothly toward the leading edge as angle of attack is increased. Next, set the percentage of the chord you want to use for the mast, and mark that on the upper surface.
Now draw a line from the mast-sail joint to just below the leading edge. You’ll want to place the front end of the line so that it is perpendicular to the airfoil contour. If it’s too far up, you’ll get a sharp crease at the leading edge, and if it’s too far down, you’ll get an indentation. Finally, measure off the distances perpendicular from the line to the airfoil contour, and lay out points equally distant to the other side of the line. This forms a reflection of the part of the airfoil and completes the wingmast airfoil. That’s all there is to it.
Clark Y Family Results
As a typical example, I picked the classic Clark Y airfoil because it has been a proven performer over a wide range of conditions. I used the procedure above to create a family of wingmast/sail combinations, with mast sizes ranging from 5% of the total chord to 50% of the chord. The resulting airfoils are shown in Figure 7. With a larger chord, the wingmasts get physically thicker, although the mast thickness ratio of mast thickness to mast chord becomes smaller, and the ideal mast rotation flattens out. But all the designs share the same leeside contour.
With larger mast chords, the sail also becomes flatter in order to preserve the lee shape. For the larger masts, it’s doubtful whether any camber has to be built into the sail at all – the air loads will add camber to a flat sail. The total camber is controlled by the mast rotation.
Effect of Angle of Attack
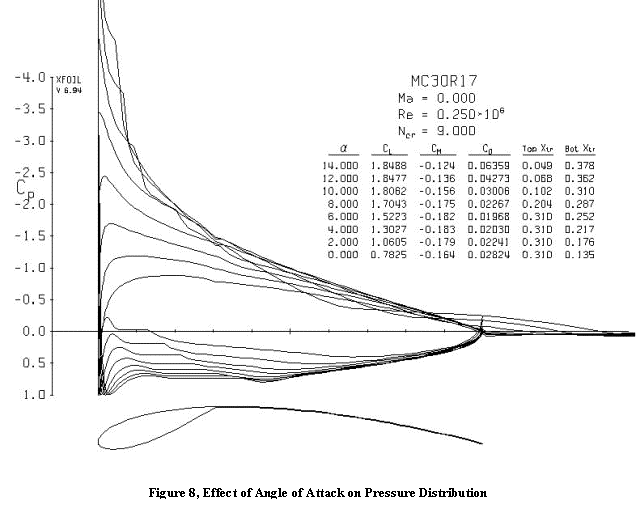
Velocity distributions for angles of attack from 0 to 14 degrees are shown in
Figure 8 for the case of the 30% chord mast.
Note that the lee side velocities peak near the leading edge, and nearly
the whole lee side has an adverse pressure gradient. This is typical of
front-loaded airfoils designed for low speeds, in order to give the flow the
maximum distance to coast down from the peak speed and to avoid any steep
gradients that might cause the laminar separation bubble to "burst"
(fail to reattach). The peak becomes
more pronounced with angle of attack and the laminar separation bubble moves
toward the leading edge when laminar separation occurred on the mast. Transition was forced to occur at the
mast/sail junction on the lee side because the discontinuity at that point was
assumed to trip the laminar boundary layer to turbulent.
On the windward side, the separation point moves aft on the mast with increasing angle of attack and the reattachment point moves forward, shrinking the size of the separation bubble. At the low Reynolds number shown, there is no reattachment on the mast after laminar separation and only one large separation bubble is formed. As the angle of attack increases, the transition point is predicted to occur later in the separation bubble. The circulation associated with the higher lift reduces the local Reynolds number on the windward side. At higher Reynolds numbers, transition occurs earlier and a small laminar separation bubble can form on the mast followed by turbulent separation leading to the larger separation bubble spanning the mast/sail junction.
These results from XFOIL are probably a good qualitative indication of the flow behavior, but the large amount of separation and the large changes in surface contour between mast and sail may be beyond the range of validity for the inviscid outer flow plus integral boundary layer approach used by XFOIL. However, the separation bubble does shrink with angle of attack as can be readily observed in practice through telltales attached to the sail.
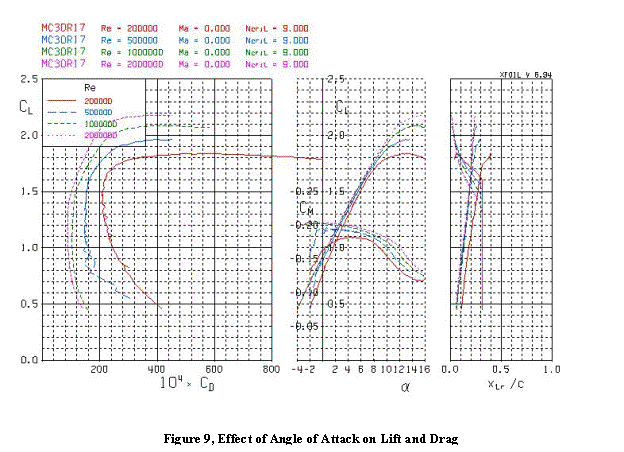
The lift curves and drag polars for
this section at different Reynolds numbers are shown in Figure 9. The movement of the transition points on
upper and lower surfaces that are evident in Figure 8 are plotted in the
right-hand graph of Figure 9. The upper
surface transition would move aft of 31% chord at lower angles of attack were
it not for the assumption that the flow is tripped there by the mast/sail
junction. The lift curves of the middle
graph show the loss of lift due to trailing edge separation at high angles of
attack. And the drag polars in the left
graph show the increase in drag with either the trailing edge separation at high
angles of attack or the growth in the windward side separation bubble at low
angles of attack. The drag polars also
show the general trend of reduced drag coefficient with Reynolds number. The actual drag increases with speed or size
of the chord, but the drag increases less rapidly than the velocity squared or
chord length used to reduce the lift and drag data to nondimensional
coefficients.
Effect of Mast Chord Length
Figure 10 shows the effect of changing mast size while keeping the angle of attack constant. Regardless of the angle of attack, the lee side behavior is virtually unchanged when the windward side is modified to form different sized masts. (I believe the notch in the lee side pressure distribution for the 50% chord mast is a local numerical problem with the panel density near the mast/sail junction and not a physical characteristic.)
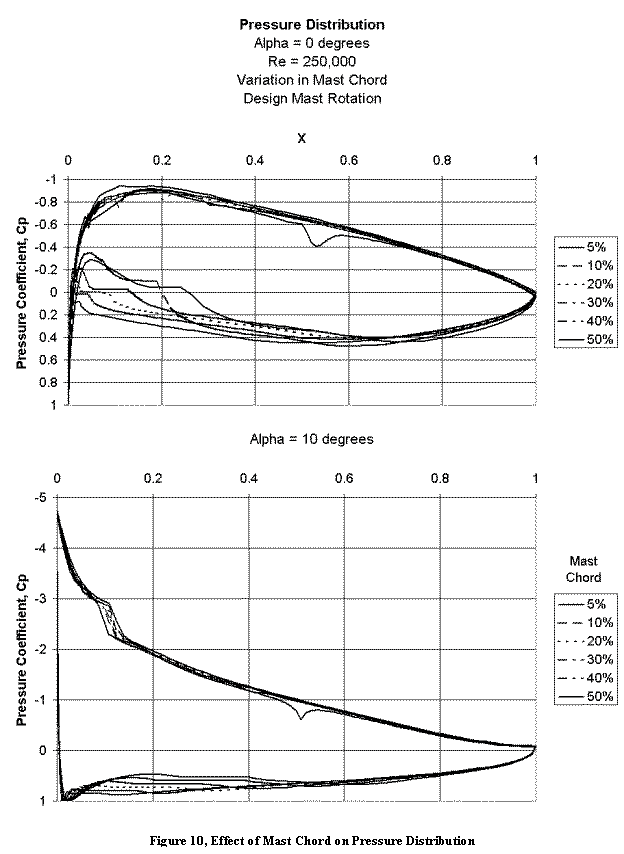
The fact that all the designs shared the same leeside contour and have the same
leeside aerodynamic behavior supports the design approach of starting with a
known airfoil and modifying its windward side to form the wingmast and
sail. The leeside will still retain its
essential aerodynamic character, although the increase in camber will shift it
to a higher lift range.
The big difference between the different mast designs is the behavior of the windward side. Once reattachment occurs on the sail, the pressure distributions are again virtually identical. But separation occurs much closer to the leading edge of the smaller masts because the combination of smaller radius of curvature and shorter distance to the mast/sail junction create a steeper adverse pressure gradient.
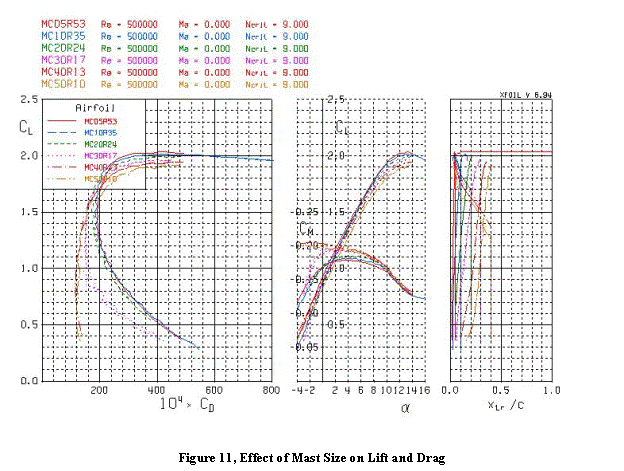
The corresponding coefficient data are shown in Figure 11. The larger mast sizes produce somewhat less
lift than the smaller mast sizes, because of the increased velocities on the
windward side. When the mast is small
enough that the flow separates near the leading edge, there is little
difference in drag between the masts.
However, the large wingmasts are capable of operating efficiently at
lower angles of attack than the small masts.
They are therefore better suited to high-speed craft like landyachts and
iceboats. There appears from these data to be little aerodynamic
advantage in large wingmasts for watercraft.
This depends on the sail maintaining the same shape for the small masts
as the mast contour of the large masts.
This may not be easy to achieve in practice, so there may be good reason
to choose a wingmast of intermediate size.
Effect of Mast Rotation
Mast rotation is a key factor in tuning a wingmast rig. All the cases above have considered the design case where the mast was rotated to line up with the sail and provide a smooth contour on the lee side. Experienced landyacht pilots will often secure the sheet and sail by rotating the mast – attesting to the power of mast trim. Mast roation can depower the rig at high speeds or induce additional camber to produce high lift for starting.
Under-rotation
The section from Figure 1 is shown in Figure 12 with the mast rotation set to zero so the mast is lined up with the boom. The sail has the same shape, but is rotated to follow the mast. There is now a large crease in the lee contour at the mast/sail junction, and a lesser crease on the windward side. Were it not for the boundary layer, these creases would result in three stagnation points on the airfoil – one at the leading edge and one at each crease. But with the boundary layer, each of these is bridged by a separation bubble. The windward side separation bubble has shrunk to less than 10% of the chord in length, and the windward pressure distribution is little changed from the inviscid pressure distribution.

The leading edge suction peak is more pronounced than for the design mast
rotation because the stagnation point is further back on the windward
side. Although transition occurs at
3.8% chord, the laminar separation bubble barely reattaches to the sail near
50% - 60% chord. With an increase in
angle of attack of less than 0.1 degree, the flow does not reattach at all and
the entire lee side is separated from the point of laminar separation just behind
the leading edge. This is known as
leading edge stall cause by bubble bursting.
Compared to trailing edge stall, leading edge stall is massive and occurs without warning. There is no gradual progression of the separation point as there is with trailing edge stall. Actually the laminar separation point may be moving forward with angle of attack, but the reattachment to form the laminar separation bubble masks the approaching catastrophe. This section can operate at a somewhat higher angle or attack at higher Reynolds numbers, because the laminar separation occurs further down the backside of the leading edge pressure peak and the flow transitions earlier, and reattaches sooner.
The Clark Y is actually very robust with respect to forming a leading edge suction peak. The NACA 6-series laminar flow sections have finer leading edges that are much more prone to forming a suction peak at lower angles of attack. This makes them more susceptible to leading edge stall at low Reynolds numbers, and therefore are not necessarily good candidates for conversion to a wingmast/sail combination.
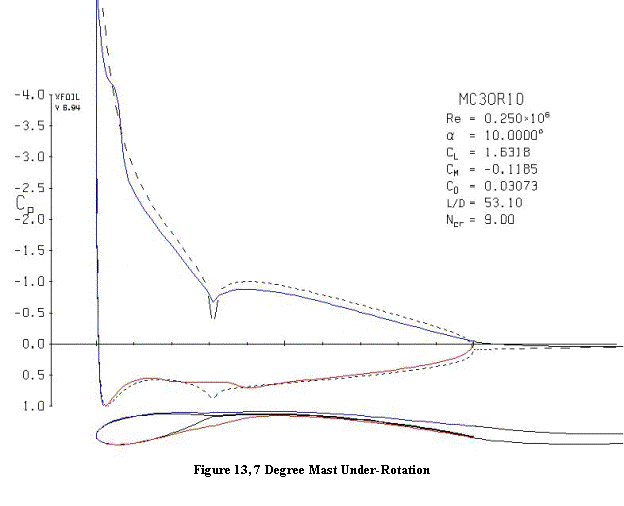
Figure 13 shows an intermediate case with the mast rotated 10 degrees to line
up with the apparent wind at 10 degrees angle of attack. In this configuration the crease in the lee
side has less of a change in direction than the crease on the windward side,
and the effect on the pressure gradients is not as severe. The windward side separation bubble is
reduced in size compared to the design configuration of Figure 1 and the
leeward separation bubble at the junction is essentially nonexistent compared
to the zero rotation case of Figure 12.
There is still a laminar separation bubble on the lee side between
approximately 5% and 10% chord.
Although the lift is in between the 0 and 17 degree mast rotations, the drag is lower than either one and the lift/drag ratio is higher than the other two mast rotations. This may be due to the reduced size of the separation bubbles. For this particular case, XFOIL predicts transition occurs earlier in the windward separation bubble, which results in earlier reattachment and a shorter separation bubble.
Over-rotation
Rotating the mast past the design angle results in a sharp ridge forming on the lee side at the mast/sail junction. Figure 14 shows the effect of a small over-rotation. Whereas a sharp concave corner forms a stagnation point in the inviscid pressure distribution, a sharp convex corner forms a low pressure/high velocity peak. The steep adverse pressure gradient on the downstream side of such a pressure peak can lead to separation, just like the case of the leading edge stall.
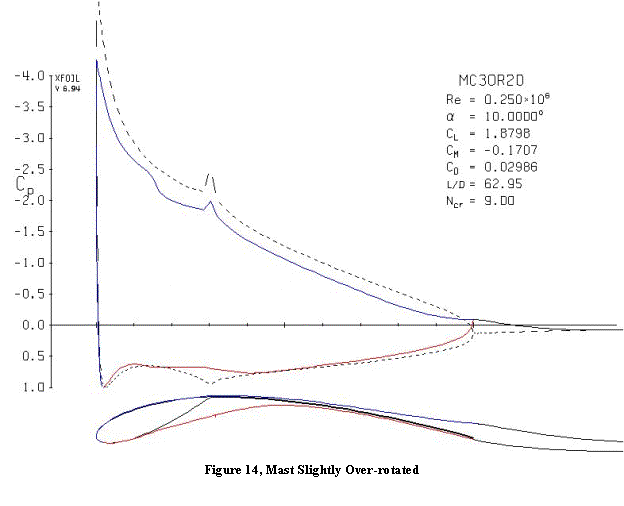
In Figure 14, the change in direction is slight – just three degrees – but the pressure
peak is evident. At the angle of attack
shown, there is still a laminar separation bubble located on the down-slope of
the leading edge pressure peak. At
lower angles of attack the pressure peak at the junction tends to fix the
laminar separation point there.
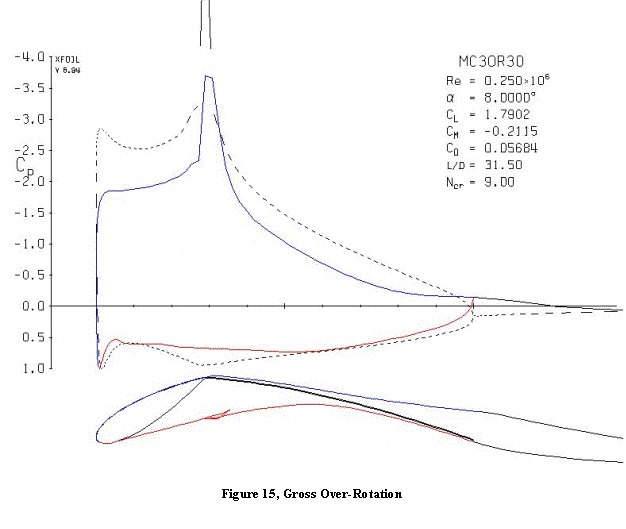
With higher amounts of over-rotation (Figure 15), the windward side separation
bubble becomes large and causes considerable drag. The large kink in the lee contour, and its associated pressure
peak, also lead to stall at a lower angle of attack.
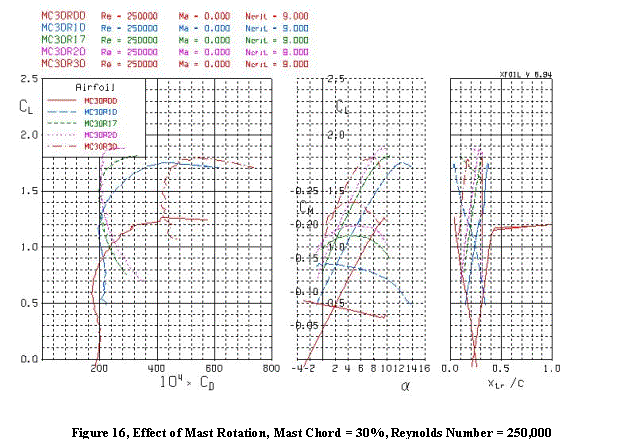
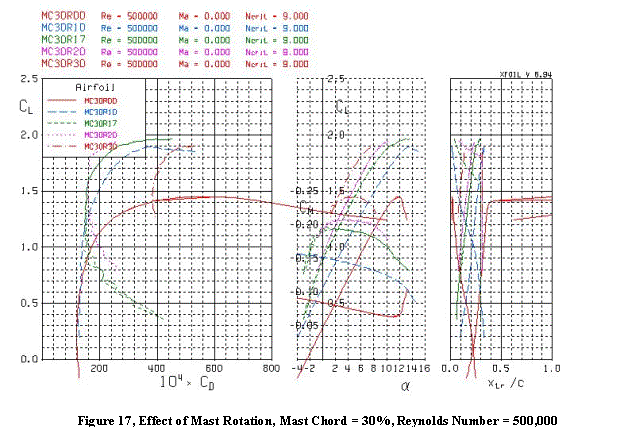
Figures 16 and 17 show the lift and drag polars for a range of mast rotations, ranging
from well under-rotated (0 degrees) to grossly over-rotated (30 degrees). Increasing mast rotation consistently
increases the lift, due to the increase in camber. Maximum lift is predicted to be comparable for all the mast
rotations, with stall occurring at a lower angle of attack for greater
rotation. The nature of the stall can
be abrupt for the off-design mast rotation angles.
However, the effect on drag is not so one-sided. Each mast rotation has a lift range in which it is most efficient, producing its minimum drag. The minimum drag appears to be comparable for the various rotations, so the rig can be tuned for minimum drag over a wide range of conditions by rotating the mast. Drastically over-rotating the mast, however, creates a huge drag penalty.
Wingmasts In Practice
So much for theory; what about real life? The essential flow features I've described - the laminar separation and reattachment, the turbulent separation bubble on the windward side, trailing edge separation at the leech - are real. You can see the larger features by the behavior of telltales. Predicting drag and maximum lift is a tricky business even for the best computer codes, and I don't pretend that the methods I've used will get it right. Experimental data are essential to get numbers that you can believe in.
There appears to be little to gain by over-rotation, so the design rotation
appears to be a practical upper limit and tuning should be restricted mainly to
under-rotation. Aligning the mast
approximately with the apparent wind does not appear to be a good strategy for
tuning the mast because it results in too little rotation over much of the
angle of attack range. Positioning the
stagnation point just to windward of the mast leading edge centerline may be a
viable approach. This can be done by
means of telltales or a wind vane positioned
as close as possible to the mast leading edge.
Instead of over-rotation of the mast while maintaining the same sail shape, these results suggest a better approach would be to use mast rotation to also change the sail shape, say by extending full length battens into the mast where they would bear against the inside wall of the mast. The mast would then force additional camber into the sail by flexing the battens, while minimizing the discontinuity in the lee side contour.
A small windvane placed just ahead of the leading edge can help to indicate whether the stagnation point is on the windward side or the lee side. A row of short telltales placed horizontally along the mast and across the sail luff can indicate the extent of the separation bubbles on both sides of the sail. And telltales just ahead of the leech can track the onset of trailing edge stall. These clues can help make sense out of the rig's behavior as the sails are sheeted and the mast rotated.
Conclusions
The aerodynamics of wingmasts are strongly influenced by boundary layer separation and reattachment, forming separation bubbles on both the windward and leeward sides. Transition from laminar flow to turbulent boundary layers typically takes place via laminar separation and turbulent reattachment at the Reynolds numbers investigated (200,000 to 2,000,000). For large wingmasts, the laminar separation point moves forward on the lee side with an increase in angle of attack.
The sharp concave corners formed at the mast/sail junction cause steep adverse pressure gradients on the mast, leading to laminar separation or turbulent separation if the flow has already completed transition. The corner is especially severe on the windward side, leading to a large separation bubble that can span most of the windward side at low angles of attack.
Under-rotating the mast can reduce the size of the windward separation bubble, but introduces a new separation bubble on the leeward side. The leeward separation bubble can be susceptible to bursting at high angles of attack, causing an abrupt leading edge stall.
Over-rotating the mast causes a low pressure peak at the mast/sail junction. Large over-rotation angles do not increase the maximum lift but do cause a large increase in drag.
Reasonable wingmast shapes can be designed by reflecting the leading edge of an existing airfoil about the mast chord. At high angles of attack, small wingmasts are as effective as large wingmasts, and the windward separation bubble can mask the effect of mast size. However, large wingmasts have less drag at low angles of attack and are therefore effective for high speed craft such as landyachts and iceboats.
XFOIL appears to be an effective program for calculating the two-dimensional flow about wingmast-sail sections. However, experimental data are needed to validate the XFOIL results.
References
- Drela, Mark, ‘XFOIL: An Analysis and Design System for Low Reynolds Number Airfoils,” Conference on Low Reynolds Number Airfoil Aerodynamics, University of Notre Dame, June 1989.
- Bethwaite, Frank, “High Performance Sailing,” Waterline Books, Shrewsbury, England, 1993.
- Barlow, Nick, “Composite Wingmasts,” Multihull International Magazine, Sept. 1987.
- Hugger, Ted, “Wing Masts,” Professional Boat Builder Magazine, Dec/Jan 1992.
- Roberts, W. B., “Calculation of Laminar Separation Bubbles and Their Effect on Airfoil Performance”, AIAA Journal, Vol. 18, No. 1, January 1980, p. 25 – 31.
- Eppler, R. and Somers, D., “Airfoil Design for Reynolds Numbers Between 50,000 and 500,000,” Proceedings of the Conference on Low Reynolds Number Airfoil Aerodynamics, Notre Dame, Indiana, June 1985.
- Bethwaite,
Frank, “Wings On Water Chapter 2”, Modern Boating Magazine, July 1974.
Appendices
Appendix G, Section Coordinates